Apparently Matt and I aren't the only chocoholics around here, because that flourless chocolate cake recipe I posted last week got some attention from a few of you! I actually wound up not being to make that particular recipe, because Kroger (our brand-new, fancy-schmancy Kroger!) didn't have any hazelnuts. Weird, huh?? So I had to improvise, but the recipe I chose instead was so sinfully, amazingly, INSANELY chocolaty, we didn't miss a thing. :)
Here it is! This cake has such a dense, brownie-like texture, it will amaze you that it contains nary a lick of flour! And - do not skimp on the glaze. YUM!
Flourless Chocolate Cake with Chocolate Glaze

Tuesday, September 30, 2008
Monday, September 29, 2008
Toot, toot!!
Gosh, what a wild week! Our internet connection has been so patchy for the last little while that every time I sit down to try to post, I find it breaking up on me, and then I inevitably am pulled in another direction before I have a time to try to get it back up and running again. Sooo, that would explain the lack of posts, and why it has taken me so long to share some very exciting news...
You are looking at the newest design team member for Feeling Scrappy!!! The big announcement was made late last week, and I am so thrilled! There are some huge, exciting changes in store at Feeling Scrappy right now that are set to be revealed very soon, so be sure to stay tuned. And mark your calendars for the Sketch-apalooza II, which is set to start next month. This is one class you do not want to miss!
You are looking at the newest design team member for Feeling Scrappy!!! The big announcement was made late last week, and I am so thrilled! There are some huge, exciting changes in store at Feeling Scrappy right now that are set to be revealed very soon, so be sure to stay tuned. And mark your calendars for the Sketch-apalooza II, which is set to start next month. This is one class you do not want to miss!
Taking time to REMINISCE!
The Reminisce paper lines have made regular appearances in my pages and other projects ever since my interest in paper crafting really took off about two years ago. I have always loved the varied textures, colors and patterns of their papers, and the fact that there are so many varied paper lines to tackle so many different scrapping subjects. When I saw earlier this month that they are hosting a contest to add to their design team, I got hard to work putting together some pages and projects using my favorite lines. I have been adding pages to the Reminisce blog gradually over the course of the last few weeks, but I also wanted to post them all here in one place. I have had so much fun with this, and seeing the caliber of submissions by all of the candidates has been downright inspiring!
Thank you, Reminisce, for this opportunity! I hope you enjoy perusing this consolidated collection of my submissions for your call!
And the individual projects, sorted by paper line:
Boys Gone Wild
"Blast Off!"
"Blast Off!"
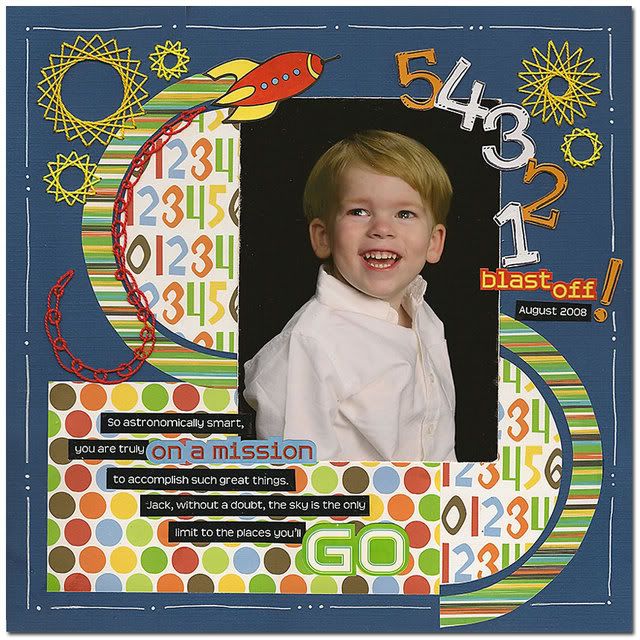
Project Notes: I did some the detailed hand-stitched stars and smoke trail from the rocket here using techniques I learned in the amazing Feeling Scrappy sewing class that just wrapped up.
Real Magic
"My Cutie Pies"
"My Cutie Pies"
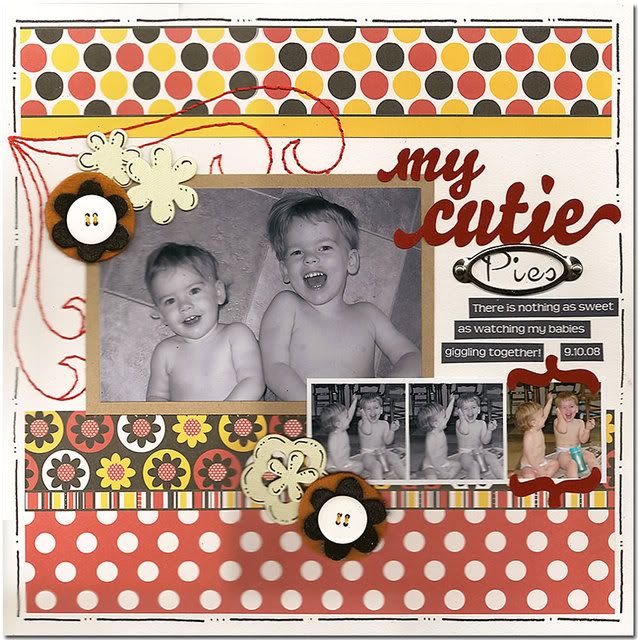
Project Notes: The felt flower embellishments here were hand-cut (the color of them has been very distorted by the scan), and I drew the flourishes free-hand before stitching them with a back stitch. The rub-ons here are Reminisce Cocktail Script.
Enchanted Autumn
"Happy Fall, Y'all!"
"Happy Fall, Y'all!"

Project Notes: Another page showcasing a cool stitch I learned in the FS sewing class. The pumpkin photos are a panorama shot that I cut into individual tiles. I find that seasonal photos are often perfect as a sort of patterned paper in their own right! The rub-ons here are Reminisce Pink Flamingo.
Girly Girl
"Life is Sweet"
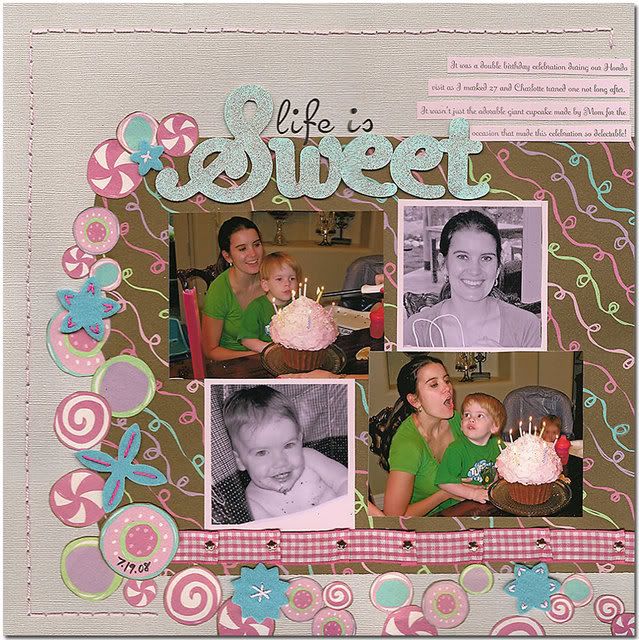
Project Notes: This paper is absolutely amazing with its lustrous sheen, and I really wanted to showcase the cute candy on one side while also using the confetti pattern on the reverse. The perfect solution was to cut the candy out to use on their own! I played a little with the photos here by tinting the square photos a shade of pink, and I love the playful effect that technique lends to the overall page. The rub-ons here are once again the Reminisce Cocktail Script.
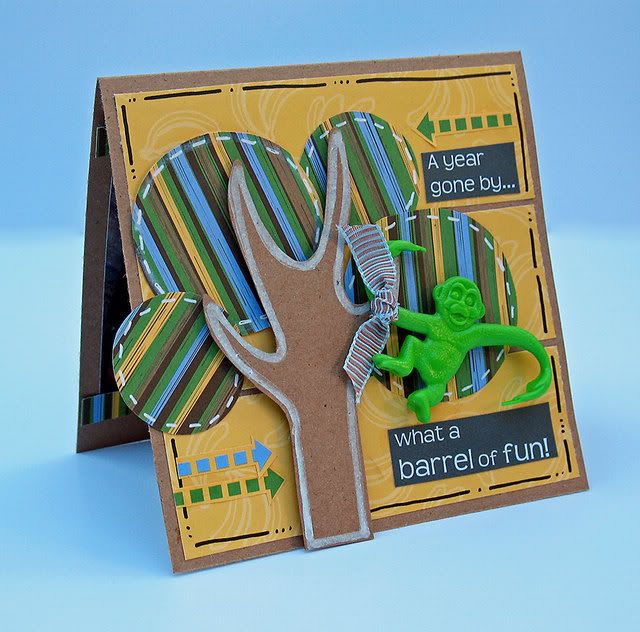
Monkey Business
"Bananarama"
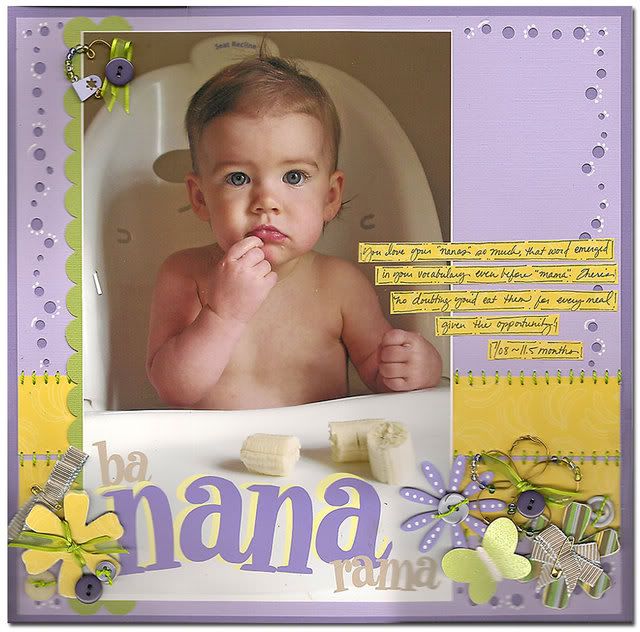
Project Notes: I covered some chipboard flowers here with the coordinating patterned papers, which is such a fun technique. This page was a study in complementary colors, as I chose the purple card stock and embellishments to really make the yellow patterned paper pop!
First Birthday Invitation
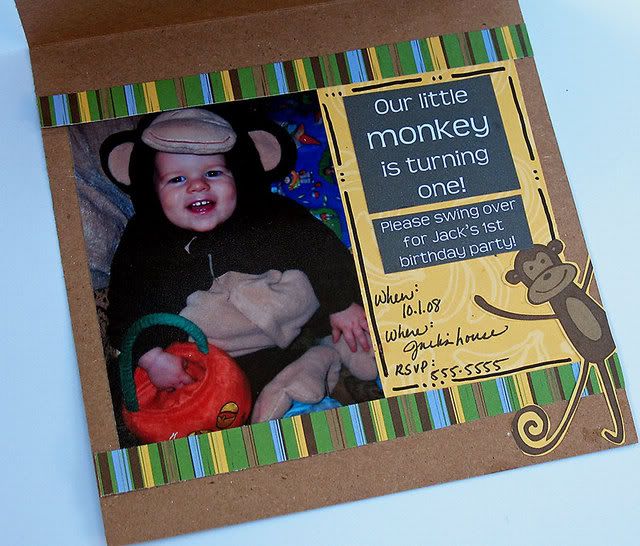
Project Notes: This invite is very similar to the one I sent out for Jack's first birthday. I gave out the Barrel of Monkeys game as favors for the children who attended. It was a hit!
French Kitchen
Decorative Block Set

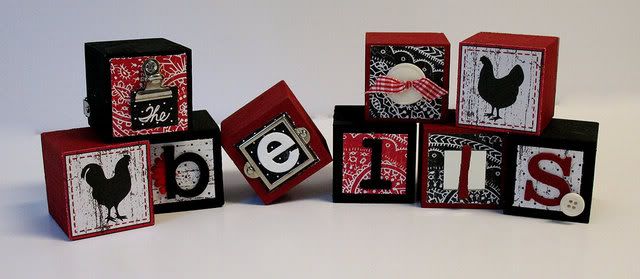
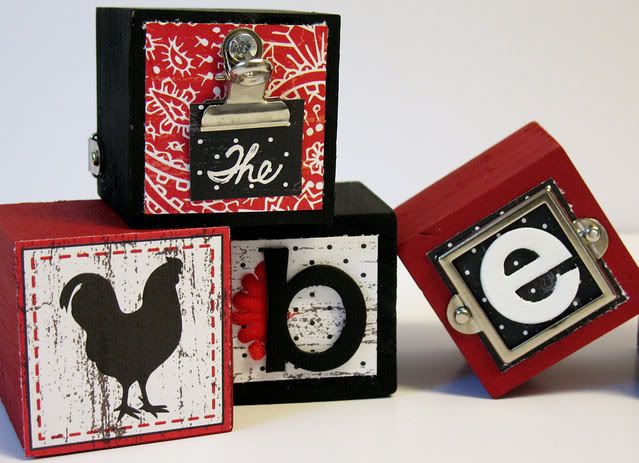
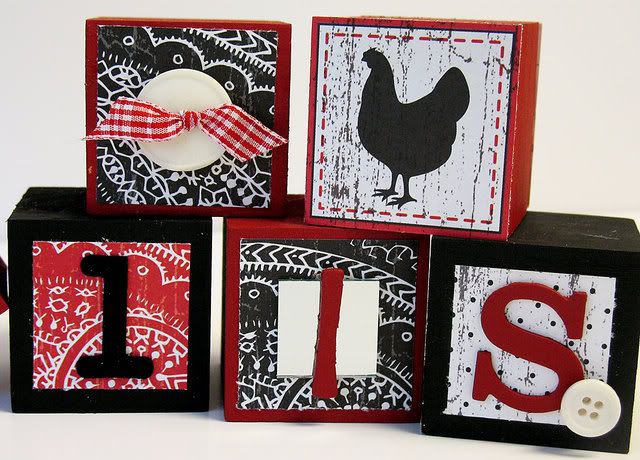
Project Notes: The moment I saw this new line, I knew the blocked rooster paper would be perfect for a block set like this one. I once again found myself wielding my drill for this project in order to adhere the metal embellishments to the blocks. Flexing my crafting muscles! I found the raw wooden blocks in the craft section at Hobby Lobby.
As always, these and many of my other projects can also be viewed in my Scrapbook.com gallery.
Friday, September 19, 2008
I can hardly wait!!!!
Today is Matt's birthday, and we are planning his birthday celebration for tomorrow night. Check out the cake I'm making him. Can you say decadent??
http://www.epicurious.com/recipes/food/views/FLOURLESS-CHOCOLATE-HAZELNUT-CAKE-241088
I'll be sure to let you know how it turns out. :)
http://www.epicurious.com/recipes/food/views/FLOURLESS-CHOCOLATE-HAZELNUT-CAKE-241088
I'll be sure to let you know how it turns out. :)
Thursday, September 18, 2008
Go-to....Thursday
So I'm a little late on my go-to for the week. It's been a long one around here, so I thought there would be no better recipe to share than my BELOVED brownie recipe, courtesy of the Baker's Chocolate box. I cannot say enough how perfect these brownies are, and that fact is very fresh in my mind since I made a batch just this week. ;)
I will post both the recipe and the link here. When I made these on Monday, I actually had to substitute 2 squares of semisweet chocolate for 2 squares of the unsweetened, since that was all I had on hand. By reducing the amount of sugar accordingly from 2 cups to 1 1/2 cups, I actually think I preferred them this way to the old standard. The texture was even fudgier than before - YUM! As an added change-up, I used toasted hazelnuts in place of the pecans. Hazelnuts are entering their peak season, so you should pick some up and give them a try. Sweet or savory, they can add such depth to any dish!
Baker's One Bowl Brownies (and that is really the truth - one bowl is all it takes!)
4 squares Baker's Unsweetened Chocolate
3/4 cup (1-1/2 sticks) butter or margarine
2 cups sugar
3 eggs
1 tsp. vanilla
1 cup flour
1 cup coarsely chopped pecans
PREHEAT oven to 350°F. Line 13x9-inch baking pan with foil, with ends of foil extending over sides of pan. Grease foil. (I never do this. I just grease my pan with Pam. :)
MICROWAVE chocolate and butter in large microwaveable bowl on HIGH 2 min. or until butter is melted. Stir until chocolate is completely melted. Stir in sugar. Blend in eggs and vanilla. Add flour and pecans; mix well. Spread into prepared pan.
BAKE 30 to 35 min. or until wooden toothpick inserted in center comes out with fudgy crumbs. (Do not overbake.) Cool in pan on wire rack. Remove brownies from pan, using foil handles. Cut into squares. Store in tightly covered container at room temperature.
And here is the link to the actual recipe.
Just for Stacy :)
Stacy brought up a very good question a couple of days ago that can come up a lot in cooking Q&A's: What type of wine is best for cooking? Our rule around here has always been that the wine we cook with doesn't have to be the crème de la crème, but it should be of high enough quality that we wouldn't mind sipping it from a glass. Some names that come to mind of inexpensive yet fine brands are Cabot, Fetzer or Beringer. Now, these aren't necessarily the wines you'd serve the queen of England (although I've had a Beringer reserve Pinot Noir that totally knocked my socks off!), but they are fine in this regard. A Cabernet Sauvignon or a Merlot are two good, reliable options for reds. For white, I tend to prefer a Pinot Grigio or a Chardonnay.
Now - and don't laugh! - we have actually for the last year or so gotten hooked on boxed wine. Not your stereotypical White Zin Franzia (I hope I'm not stepping on any toes here - lol!), but a very tasty little Merlot that comes in a lovely black box. Each box holds the equivalent of 4 bottles of wine, and once opened, the wine will save for several weeks. (Corked wine from a typical bottle loses its zip even after just a few hours.) And the total cost comes out to be about $7/bottle. Can't beat that with a stick! It's a nice option for having a decent wine for drinking and cooking on hand without worrying about it going "bad." Boxes are actually starting to make a cool resurgence thanks to their kitschy, retro appeal (and the fact that they are superior is preserving the integrity of the product), so you should check out your local wine store to see what they carry!
Stacy, I hope this has helped answer your question.
Cheers!
Amy
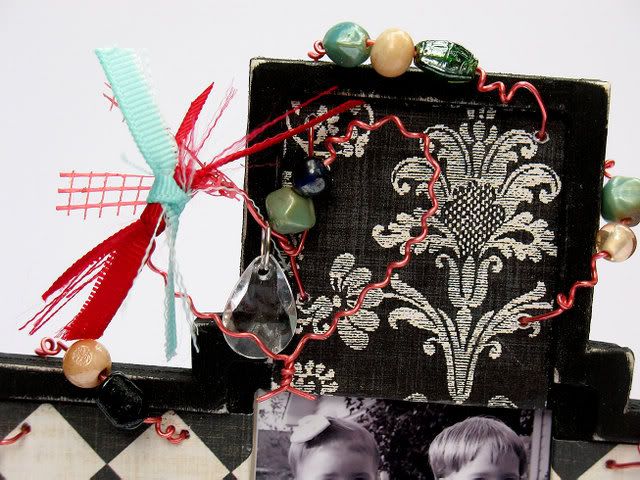
Altered frame project
I found these cool unfinished cross frames at Hobby Lobby early in the summer, and I just got around to jazzing one of them up as I have been planning to. What a fun project! I pulled out the cordless drill so I could attach my craft wire and beads by looping it through the frame itself. Mom, I know you're seeing this - so let this serve as a very public THANK you for all of the adorable clothes and goodies lately for the kiddos and me. (Y'all should see the adorable apron she made for me and sent along with one of the latest "shipments" of clothes for Charlotte and Jack. I really must take a picture!) Anyway, Mom, I snapped this pic of the kiddos in their new duds, and I think this frame will be just perfect in your new craft room. So keep your eyes peeled for the mail carrier. ;)
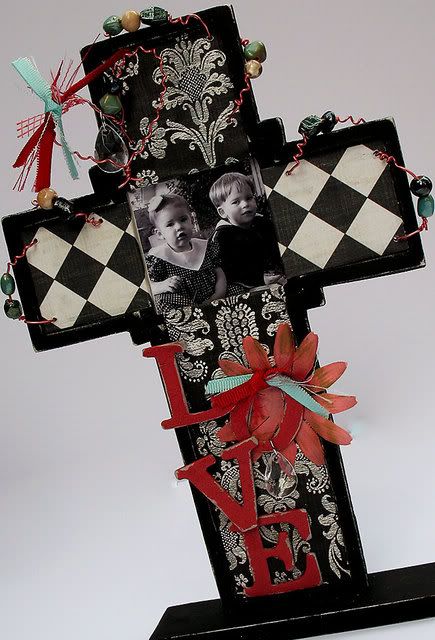

There are three lessons to be learned from this project:
1) Never underestimate that the VBS section at Hobby Lobby can have some TERRIFIC unfinished projects just begging to be altered.
2) Craft wire is downright addicting to use.
3) Every girl should be comfortable wielding a drill when necessary. :)
Monday, September 15, 2008
Where's the beef?
I have been planning for close to a week now to make a pan of my lasagna, but I just haven't had an afternoon open up lately that has allowed me the time to stand at the stove for the time it takes to put it together. I'm keeping my fingers crossed that tomorrow during Jack's MDO I'll be able to manage it! (By the way, keep your eyes peeled for another Go-To Tuesday recipe tomorrow. :)
Anyway, the lasagna requires a bit of ground beef, so I had that on hand last week. And when the lasagna didn't pan out, I was reminded of how many options are open for an impromptu supper when all you have on hand is ground beef! I was able to put together these two yummy dinners, and all at lightning speed. I thought I'd share my "recipes" with you, although you'll have to bear with the loosey-goosey nature of these directions since I usually prepare these off the cuff. I hope they will inspire you to see what a delicious and economical dinner option ground beef can be. Enjoy!
Chopped Steaks with Easy Onion Gravy
1 lb. ground beef
Approx. 1/2 c. bread crumbs
1 Tbsp. Worcestershire
1 egg
1 tsp. Cavender's Greek seasoning*
Salt & Pepper, to taste
3 Tbsp. Canola Oil, divided use
1 medium sweet onion, chopped
1/3 cup dry white wine
2 Tbsp. butter, softened
2 Tbsp. flour
2 cups beef broth (I always make my own with beef base that I keep on hand)
2 tsp. soy sauce
1 tsp. dried thyme or 1 Tbsp. fresh thyme, chopped
Mix ground beef and bread crumbs, Worcestershire sauce, egg, Cavender's, salt and pepper by hand in a large bowl. Form into four patties, as you would for hamburgers.
Heat 2 Tbsp. canola oil in large saute pan over medium-high heat. Add patties and saute until deeply browned on each side, about 3 minutes per side. Remove beef from pan and set aside. Reduce heat to medium and heat remaining 1 Tbsp. oil in same skillet. Add onions and saute until translucent, about 3 minutes. Add wine to pan and stir to scrape up browned bits that have accumulated on the bottom of the pan. Simmer wine/onion mixture until thickened and bubbly, and then add the beef broth, whisking briskly to incorporate.
In a small bowl, blend the butter and flour into a smooth paste. Whisk mixture into simmering onion/wine/broth mixture until smooth, and bring back up to a simmer. Stir in soy sauce and thyme, and season to taste with salt and pepper. Add steaks back to sauce, coating the steaks on each side with the sauce. Cover pan, reduce heat to medium-low, and simmer for approximately 15 minutes, or until steaks are cooked through and sauce is thickened. I like to serve these with a heaping bowl of mashed potatoes and some English peas.
*If you've never used this before, you really should try it! This is a terrific blend of herbs and spices with flavors of oregano and garlic, and it is a great substitute for poultry seasoning or seasoned salt. It is actually made here in Arkansas, of all places!
* * * * * *
Now, in this second recipe, I am going to urge you to try something new! I know for many of us, tacos are a go-to meal when we're too tired to prepare anything else. We brown the meat and keep the folks at Old El Paso quite happy by tearing open a packet of their seasoning mixture. It dawned on me one night as I was reading the back of that handy-dandy packet (which, by the way, is laden with sodium and lots of not-so-healthy additives) that I have spent a veritable fortune to stock my spice cabinet with the same spices included in taco seasoning, so why on earth was I not making my very own at a fraction of the cost? And as a much healthier option, to boot!
Amy's Taco Beef
Brown and drain 1-1/2 lbs. ground beef
Then add 1 recipe taco seasoning mix:
2 tsp. chili powder
1-1/2 tsp. smoked paprika
1-1/2 tsp. cumin
1 tsp.onion powder
3/4 tsp. garlic salt
1/2 tsp. salt
1/4 tsp. cayenne
And stir in:
1/3 to 1/2 cup water
Bring to a boil; cover and simmer over medium-low heat until your desired consistency.
The taco seasoning mix can be made beforehand and stored in an air-tight container until ready to use if you are a stickler for having things pre-prepped. Around here, we always have taco salad in lieu of tacos. Have you seen the tortilla bowl makers? Everyone needs a set of these! They make ordinary tortillas into crispy taco bowls, and without any added fat. They are perfect! To make my taco salad mixture, I take a prepared recipe of my taco beef and add a drained can of mexicorn and a drained can of seasoned black beans. I chop up a head of iceberg lettuce, and then layer the lettuce and then the meat in the the taco bowls. Topped with your choice of cheese, sour cream, salsa, and/or avocados, this is a delicious meal that is actually not so bad for you!
I hope y'all enjoy these easy weeknight meals. You'll have to let me know what you think!
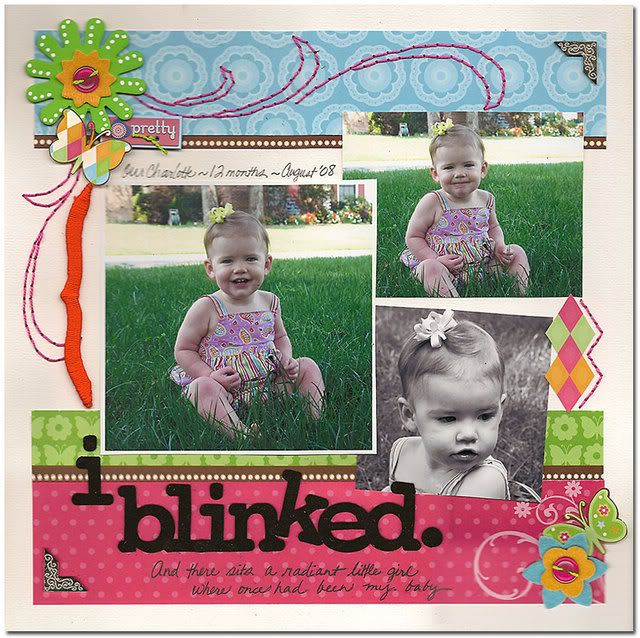
Having a blast
Nearly another week gone by, and still scrapping up a storm! It is so amazing when the creative juices really get flowing, don't you think? I just finished this one last night, and I had so much fun with it! It seems like I go in bursts where I will do 2-3 pages for one child before switching gears and starting a few for the other. I have another on my desk in the works for Jack even as we speak. :)
Thanks so much for stopping by!
Thanks so much for stopping by!
Wednesday, September 10, 2008
I have been a scrapping fool!
This might go on record as my most ambitious month of scrapping ever. I am currently involved in two terrific online classes, both of which are stretching me creatively and giving me tons of inspiration! Got Sketch 102 is the second sketch class to be offered by Valerie Salmon and Janna Wilson. I missed the first installment, but I am SO glad to have gotten in on the second. The sketches have been top-notch, and the community of fellow scrappers has been so friendly! I mentioned before that I am also taking the Sew Scrappy class at Feeling Scrappy, and like always, this class hasn't failed to impress! There have been so many fantastic tips, and the examples creative by the super design team over there have been marvelous.
I can't say enough how much I have grown as a scrapper by stepping outside my comfort zone and taking classes like these. I look back at my work from even 6 months ago, and I am floored by how much my style has evolved! I really feel like I'm starting to come into my own.
Here is one I wrapped up a couple of days ago with the inspiration I've garnered from both classes. The photos here (and the colors, too!) make my heart smile. It is so amazing how quickly the time goes by, isn't it? This paper is from Die Cuts with a View, and I have to say I just love this latest trend of offering one sheet of patterned paper with a sampling of strips of different patterns. Rarely do I ever use up an entire sheet of patterned paper, but I always wind up buying 2-3 sheets of the coordinates to give my layouts pizazz. With these 1-sheet border samplers, I get the same impact for a fraction of the cost (and waste!). Can't beat that with a stick. In addition to DCWV, I have seen lines from Reminisce and The Scenic Route that offer the same option. (I think it's Scenic Route that calls these sheets "Strip Tease" or something like that. Very clever. :) And such a great value!
And a link to the product page: http://www.diecutswithaview.com/product_view.php?id=1531
Check it out!
Since I got my SCAL software, I've been doing a lot of research into the different font sites available on the web. When I came across this one, it went straight into my favorites! The handwriting fonts here are terrific (and there are so many of them!), and many of the other fonts available mimic the look of the hottest letter stickers and chipboard embellies on the market right now. And apparently you can submit a sample of your handwriting, and if they like it well enough, they will make a font from it. Fun (and free!) stuff!
http://www.kevinandamanda.com/scrapbook/fonts/
http://www.kevinandamanda.com/scrapbook/fonts/
Tuesday, September 9, 2008
Go-To Tuesday
Every cook needs a repertoire of go-to recipes he or she can turn to in a pinch. Over the course of the last few years, I have built up my arsenal of these recipes through a process of trial and error (and oooooh, the errors!!), and I thought it might be nice to share some of these with you here. So feel free to print these out and add them to your recipe boxes. I promise that they're that good. :)
No recipe collection can do without a good go-to for chicken and dumplings. There is just something so comforting found in a hearty bowl of this delicious stew, and something about the first hint of crispness that comes in the early fall has me yearning to make a batch! Matt was actually the one who mentioned this recipe this morning when I asked him what he would like to eat for dinner, so tonight marked the first chicken and dumplings of the year.
In my experience, the thing that separates this recipe from the others I have tried is the dumplings themselves. They are seriously so easy, it's just plain silly. Really. If you can mix with a fork, you will do great! I have tried other recipes that call for rolling out the dough, in the process creating such a FINE mess, I think the resulting dish could have been used as mortar for new homes in the area. With this recipe, I simply use my mini scoop (the size I use for cookies) to dollop evenly sized portions on the simmering broth. Simple as that!
There are some steps involved in this recipe, but none is at all complicated. This is a wholesome, no-frills recipe that is sure to win rave reviews. Enjoy!
Chicken and Dumplings
For the chicken -
1-1/2 lb. boneless, skinless chicken thighs
1/2 cup all-purpose flour
1 t. kosher salt
1/2 tsp. cayenne
1/4 tsp. black pepper
1 leek, sliced in half moons
1 rib celery, diced1 carrot, diced
1 sweet potato, peeled, cut into large chunks
2 parsnips, peeled, diced
2 bay leaves
1/2 cup dry white wine
1 qt. low-sodium chicken broth
2 tsp. fresh lemon juice
1 tsp. each chopped fresh sage and rosemary
For the dumplings -
1-1/2 cups all-purpose flour
3 T. Parmesan cheese, grated
2-1/2 tsp. baking powder
2 tsp. sugar
1 tsp. kosher salt
1/2 tsp. cracked black pepper
2/3 cup whole milk
3 T. unsalted butter
Preheat oven to 375 with rack in the center. Cut chicken into large pieces. Combine flour and salt, cayenne and pepper in a resealable plastic bag. Dredge chicken in flour, shaking off excess. In a deep oven-proof pot, heat 1 T. vegetable oil over medium-high heat. Brown half the chicken; transfer to a plate. Brown the rest of the chicken in 1 T. oil; remove. Reduce heat to medium. (Be sure to SAVE your dredging flour.)
Sweat vegetables and bay leaves in 1 T. oil until softened, 5 minutes. (Sweating means to place all of it in a pot with the oil, stir to coat, and then cover and cook, stirring occasionally. Basically a combination of sauteeing and steaming.) Deglaze with wine; simmer until nearly evaporated. Stir in remaining dredging flour to coat vegetables. Gradually add broth, stirring until smooth. Cover pot and transfer to oven; cook for 20 minutes. (While stew is in the oven, make dumpling dough.)
For the dumplings, blend dry ingredients in a mixing bowl. Heat milk and butter until butter melts; blend into dry ingredients. After you remove the stew from the oven, stir in the chicken, lemon juice and herbs, then bring stew to a simmer on a burner. Shape dough into small balls (I use a small ice-cream scoop, like I use for shaping cookies) and drop the dumplings onto the simmering stew. Return pot to the oven and braise until dumplings are cooked through, about 20 minutes. You can test them for doneness with a toothpick. When it comes out clean, you're set!
Wednesday, September 3, 2008
New roast recipe
What better way to get over the mid-week hump than to give y'all some yummy food for thought? I am going to try to be better about posting more recipes that I come up with and others that catch my eye. Let's get started with this terrific beef roast I made last night that I found on Epicurious. With a few small changes, this truly become one of the best roasts I've ever made. The major substitutions I made were using red wine instead of white, and replacing the water with beef broth for added flavor. (When using beef broth, though, be sure to adjust your other salt additions accordingly so it doesn't come out too salty.) After removing the roast from the oven, I let it sit for about 15 minutes and then skimmed as much fat as possible from the surface of the cooking liquid. I then removed the roast itself from the Dutch oven to slice the beef. Meanwhile, I brought the cooking liquid to a simmer over medium heat, and I threw together a beurre manié (a thickening paste made from equal parts softened butter and flour - for this I used 1 heaping tablespoon of each). I stirred in the beurre manié and cooked for about 5 minutes, until thickened and bubbly. Yum!
In spite of the amount of wine used here, this recipe isn't boozy in the slightest. And the onions give this gravy almost a French onion soup feel. Divine! The recipe recommends serving with egg noodles, which would be terrific, but I went the ultimate comfort route and served the roast alongside a heaping bowl of mashed potatoes and some English peas.
The recipe link...
http://www.epicurious.com/recipes/food/views/WINE-BRAISED-CHUCK-ROAST-WITH-ONIONS-231357
Monday, September 1, 2008
ScrapStreet Magazine
My page "Picture Perfect Thanksgiving" was chosen for publication in the September issue of ScrapStreet.com Magazine. When you get a chance, you should head on over and take a look! My page is in the Chic Street section, which focuses this month on doodling in your layouts. (Is there anyone else who has to giggle every time they hear or say the word "doodle?" :) I know I've said this ad nauseam, but for anyone who is a fan of doodling (he he), the Soufflé pens are an absolute must-have!
Subscribe to:
Posts (Atom)